 Sanding and finishing is the most challenging element of a hardwood floor installation project. An expert hand is needed to use the specialized sanding equipment. The process must not be rushed or any details overlooked otherwise the end result will be disappointing at best. A respectable floor finish can be obtained by anyone who is a stickler to detail. This article main focus is on the basic red oak strip floor. The contents of this article pertinent to all floors but each species of wood have different sanding and finishing nuances. The wood and finish manufactures recommendation must be followed for each species.
The new strip floor has been installed and given a little more time to acclimate to the house environment. This allowed the floor to relax and for any small cracks or raised edges on the strip flooring to occur prior to sanding and finishing. The first step to finishing a strip floor is a thorough cleaning and inspection of the floor. The entire area should be swept clean. All nail should be counter-sunk bellow the depth of sanding. Nails that come in contact with the sanding equipment can ruin the sanding drum or produce sparks which can cause fires.
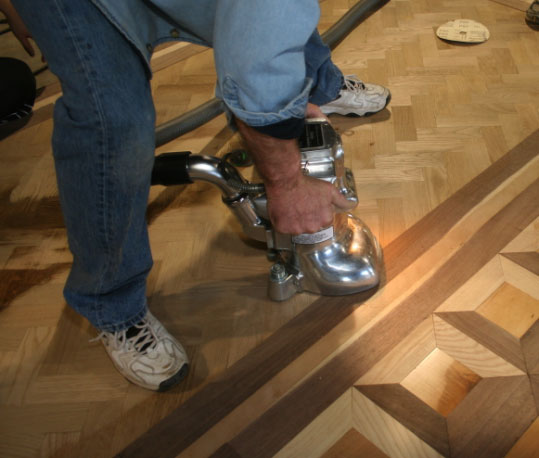
Most of the sanding is done by a large drum driven sanding machine. The two types are belt and drum machines. I prefer a belt machine to a drum sander. On a drum machine the sanding paper is wrapped around the drum and inserted in a slot. The slot on the drum can have the tendency to cause imperfections on the floor. Belt machines have their sandpaper wrapped around a drive drum and also a tensioning roller. The belt machine runs cooler than the drum design. The sandpaper is more expensive for the belt machine but easier for the novice to install. This becomes more of a factor on worn rental shop equipment. When renting a drum or belt machine you should inspect the drum for damage. Any damage will cause imperfections in the floor.
The small wheels should be inspected to ensure they are round and clean otherwise it will cause imperfections. Prior to leaving the rental shop find out how the machine is set up to run. My machines start on the left wall and work towards the right. This ensures my wheels are always running on new sanded flat floor. Each cutting pass will make the floor flatter. Make sure you have an adequate electrical circuit at home. Low voltage will damage the machine also cause imperfections in the floor.
The machines I have never touch the ground unless they are actually sanding. This protects the drum and wheels from damage. Sanding machines are very sensitive and just about anything can correspond to an imperfection in the floor. When not in use for ten minutes the drive belts are loosened. Imperfections in the belts will correspond to imperfections in the floor. Always start the machine and let it warm up prior to sanding for this reason. Prior to actually using the machine on your floor, practice raising and lowering the drum on a piece of plywood. The machine must be moving across the floor when the sanding drum is contacting the floor. It is similar to learning to drive a manual transmission car. Except each time you forgot to let out the clutch and the car lurched foreword; the sander you will leave a large deep sand mark in the floor that might not come out.
The edger machine spins a round disk and is used to sand where the big machine can not reach. Edgers have small wheels in the back, which help the unit glide over the floor. Do not press down on the front of the machine or the sanding disk will gouge the floor. It is important to understand where the on the disk the unit is sanding the floor. My edgers cut on the edge of the sanding disk from the one to two o’clock positions. The edger is positioned such that this area will contact and sand the floor with the direction of the wood grain. An edger should easily glide across the floor. If it does not check to see if the unit is not set right or the rubber disk is distorted.
A hand scraper is used to reach areas in the corners of the room where the edger can not reach. Care should be taken to work in the direction of the wood grain. Going against the grain will cause deep gouges. Areas hand scraped should be blended in by hand sanding or an oscillating sander.
Floor buffing machines outfitted with abrasive screens are use to blend all the different types of sanding that were done to finish a floor. Otherwise a picture frame effect could be produced due the differences in sanding methods. The buffer is also use in between coats to smooth out imperfections and promote intercoat adhesion.
Using the proper abrasive sequence is one of the most critical factors to a successful job. The initial sandpaper grit will be determined by the finish manufactures recommendation for the final grit and the amount of overwood in the floor. The sanding sequence should always be adhered to and never skip more than one grade of paper per step. Skipping more than one grade of sandpaper will leave the floor with scratches. This is due to only the very top on the peaks of the scratches would be removed. The deep valley of the scratch would remain. The wood floor finish would not fill these valleys and the floor will wear prematurely. Always start with the least coarse grit possible needed to efficiently sand the floor. The courser the starting grit means the more steps needed to remove the scratches. On a typical oak strip floor the finish manufacture might recommend ending the sanding sequence with a 120 grit screen. The sanding sequence might start with 60 grit sandpaper proceed to 100 grit sandpaper and finished with the 120 grit screen.
The floor has been cleaned and inspected. Any damaged boards that were found have been repaired. The area should be sealed of with plastic to prevent dust contamination into other areas of the building. Record the moisture content of the strip flooring. Just prior to applying the finish the moisture will be checked again to verify it is within the finish manufactures recommendations.
Install a 60-grit belt on the belt machine. Put your safety glasses, earplugs and dust mask on. Plug the machines electrical cord in and let it warm up. With most unfinished strip flooring installations there will be a normal amount of over-wood present. A 60 grit abrasive on the belt machine should remove the slight differences in heights between the pieces of strip flooring. A lower grit should be selected if a test pass with the 60 grit does not work. The first pass with the belt machine should be performed at a 15-degree angle to the length of the wood. By sanding at this slight angle the machine does not bounce on the overwood at the butt ends of the strip flooring. The slight bounce would create a sanding mark each pass. Sanding at a slight angle also allows us to you a finer grit abrasive. We must sand the floor again with the same belt but now in a straight direction. This will remove the slight cross grain scratches.
Sand two-thirds of the length of the room remembering to stagger you stopping place on each place. Turn around and sand the other one third of the room. Overlap your passes by two to three feet. Never stop in the same exact area of overlap otherwise a distink sanding line might be created. Sweep the floor with a broom when the entire room has been sanded. The floor should be swept clean after each sanding step otherwise the sawdust hampers the abrasives' effectiveness. The floor should be sanded with the 60-git belt once again but in a straight line with the length of the wood. Sanding straight will help remove the wood cross grain scratches produced by the last fifteen degree sanding step.
Small cracks in the floor can be filled with wood filler. The areas could have every imperfection spot filled or the entire floor could be filled using a trowel.
The areas around the outer peripheral of the room not reached by the belt machine are sanded using the edger. In most cases the edger can be loaded with the next grade of sandpaper in the abrasive sequence. The edger will be loaded with an 80-grit sanding disk. After all safety precautions have been followed, verify where on the edger sanding disk the machine is cutting on the floor. Never change the sandpaper with the machine plugged in. It is too easy to hit the power switch. Never leave the machine standing when not in use or while plugging the unit in. The edger can make a mess when it runs away by itself. Turn the power switch on with the sanding disk not in contact with the floor. Start the edger on the left side of the wall and work towards the right. Start with the edger against the wall with the machine turned as much as possible so as the disk is cutting in line with the direction of the grain of the wood. Move the edger back and forth a comfortable distance for across the wall for you, say twenty inches. Move the edger away from the wall a little after each pass. After the first pass the edger can be rotated slightly more in the clockwise to position the cutting area of the disk with the direction of the grain of the wood.
Sweep the floor clean. Load 100 grit paper onto the belt machine. Start the unit and let it warm up. Sand the room as before in a straight line with the wood grain. Sand two thirds of the room first and then the remaining one third.
Hand scrape the corners of the room where the edger could not reach. Scrape with the wood grain. A slight angle may bee used if access is a problem. The angle of the scraper to the horizontal will determine the amount of wood removed. A file is used to clean up the cutting area of the blade.
Sweep clean the floor. Hand sand or use a random orbit sander with 100-grit sandpaper. Sand the outer perimeter of the room were the edger and hand scraping was performed.
Sweep the floor clean. Load the buffing machine with a driving pad and 120-grit screen. The buffing machine is used to blend the different types of sanding performed on the floor. Start by screening the outer perimeter of the room. Now, screen with the length of the room working towards the middle of the room. When you have reached the middle of the room stop and then start screening from the opposite wall towards the middle. As the screen is use the abrasive is worn down and abrades less, by starting on opposite walls and meeting in the middle of the room the floor will blend better. Verify which section of the buffer screen is abrading the floor. The buffer you are using probable turns counter clockwise and abrades the floor from the one o’clock to five o’clock position. Turn your buffer forty-five degrees in the clockwise direction to the floor so as the buffer will abrade the floor with the direction of the wood grain. At the end of the pass turn and return through the same area so as to abrade the other half other buffer swath. The areas where the buffer could not reach will have to be hand worked with a piece of screen.
Vacuum ever inch of the room after time has been given for any dust to settle. Dust from windowsills will fall on your wet finish you are about to apply. Tack the room with a clean lint free rag. Lightly dampen the rag with the solvent used in the finish. Oil based polyurethane would use mineral spirits on the tack rag. Water based polyurethane would use water on the tack rag. Move the tack rag only in one direction while cleaning the floor so the dust stays on the rag. A dry micro fiber tack cloth also may be used.
Measure and record the moisture content of the floor. Read and follow the manufactures directions on the finish can. Not following the directions will probable lead to sanding the floor again. Sealers are generally used on the first coat and reduce the absorption of subsequent coats so that a layer of finish is built up on the surface of the wood. It can also help some finish adhere to the floor.
Oil base finishes seem to be easier for the novice to apply. Professional water base finishes especially two-part type take practice to develop the knack of applying it. Oil based finishes are applied with a lambs wool applicator and a brush. The water base finishes are applied a snow plowing type method use an applicator bar outfitted a tube with a synthetic type fur on it. The corners are done use a pad type applicator made of the same material. The finish manufacture Basic Coating does make a water base finish called Emulsion that applies likes oil. It is a one part and has the amber look of oil.
Stir the contents of the oil base finish container. Pour the finish through a strainer into a dish wash pan lined with a clean garbage bag. The garbage bag makes a great sterile container ever time and aids in clean up. Allow the finish to sit to allow the bubbles to escape. Areas that require more than one can of finish should have the cans mixed together so as to ensure a uniform gloss level. Use the original can container for the brushwork around the room. Remove the excess finish from the brush. Nail holes in the lip of the can will help drain the off finish instead of it running down the side of the can. Hand brush with the direction of the wood grain the area next to the wall using even brush strokes. Over brushing can cause bubbles in the finish. Remove excess finish from the lamb’s wool applicator. The sealer coat is applied using short cross stokes which change to long straight even strokes. At the end of the stroke the applicator is gently lifted of the floor in one graceful motion. Care must be taken not to overwork the finish so as to avoid imperfections in the floor.
The floor is abraded between coats of finish per the manufacture recommendations. The abrading promotes intercoat adhesion and helps removes grain raise and small imperfections. Finish coats are applied with the direction of the wood grain. The knack of gilding the applicator off the floor can be practiced on the first couple of coats. Vacuum and tack the floor like you are working in a hospital. A dry micro fiber tack cloth works well. If you wet tack the floor, it has become common practice to use water for both types of finish. Use a damp tack cloth, not wet. Do not use tack cloths that are contaminated with silicone or wax.
I do not prefer to intercoat abrade with screens, it can leave scratches that seem magically appear at the end of the job (I have inspected many floors that the contractor said the scratch fairy put them there). I prefer sanding strips under a buffer-driving pad. This seems to produces a higher quality finishes. I generally use 180 grit strips for oil based finishes and 240 grit strip for water based strips.
Water base finishes use different applicators than oil base products. Also make sure to the waterbase applicator recommended by the manufacture. The weight of the specific applicator helps meter the correct film thickness of the finish. Apply the correct thickness is crucial in a water base application.
The wall area is hand worked as per oil base finish except a pad applicator is used. The majority of the room is done using a snow plow method with a bar applicator. A line of finish is poured down the length of the room. The applicator moves this puddle in a snow plowing motion. A plastic garden watering can help meter the puddle line. The finish is pulled around the room. At the end of the room the applicator does an one hundred and eighty-degree turn and prepares for the next pass. The curved turn area must be straightened and blended otherwise the curved lap marks will be present when the finish dries.